Saturday, January 31, 2009

12 x 12 Folded Book

I spent a wonderful day today with about 20 other demos from the group that I'm a part of. We met with my 5th upline, Jan from Arizona. She came, despite the cold, to share her expertise and a cute book project. (I'll share that book another day.) We had a great time and lots of fun! I shared a 3 minute demo with the group. This cute little book that I shared is just one 12x12 sheet of Designer Series Paper scored, cut and folded then, held together with a little Sticky Strip.


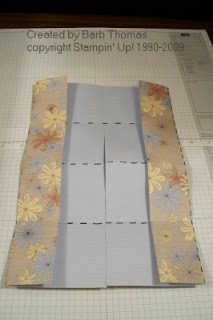
Score along one edge at 3", 6" and 9". Turn and score at 2", 6" and 10". I marked the score lines so you can see where they are.


Cut along the 6" score line from the top edge, down 9" to the intersection of the last score line (marked on the right-hand photo above with a solid line).

Place Sticky Strip in corners at each end of 2" scored sections as shown. Fold and adhere edged. These will become the pockets in the book.


Accordion fold the other scored lines and fold as shown. Place Sticky Strip around edge as shown. Fold book in half and adhere tape. Accordion fold book together.


For the binding cut a 4" x 1-1/4" piece of coordinating card stock. Score it longways at 1/2" and 3/4". Fold along score lines. Use Sticky Strip to attach binding along folded edge of book. Book can be held closed with ribbon or a belly band. Decorate cover as desired. Fill pockets with verses, well wishes, pictures, money, etc.
Enjoy,
Barb
The "Basic" Congrats card

For those who know about my nephew, we're proud to announce that he graduated from Basic Training yesterday. Now, he is off to his job training. This is the "congrats" card I sent him. Nothing fancy just simple but nice. The word stamp is from the "Congrats" Sale-a-bration set.


Stamps: The Free and the Brave, Congrats. Classic ink Riding Hood Red, Night of Navy, VersaMark Ink. CS: Riding Hood Red, Whisper White, Ballet Blue, Night of Navy, Confetii White. White embossing powder, heat tool, powder pals, embossing buddy.

Barb

Monday, January 26, 2009

Turning My Simply Scrappin' Kit into a few cards...

I finally decided it was time to start writing my thank you notes for Christmas. I needed a bunch of cards and I didn't have a lot of time to spend designing them. I remembered seeing a demonstration by Patty Bennett on a Stampin' Up! video that showed how she took a Simply Scrappin' kit and turned it into a gazillion 4x4 cards (give or take a few). So, I pulled out an old Simply Scrappin' kit that I had gotten for free from the 2007 Sale-a-bration! sale and even had the coordinating Delight in Life stamp set to go with it! I got that free too as part of that Sale-a-bration! sale. I added a few supplies...coordinating ink colors, ribbon, brads, glue dots, dimensionals, marker, a couple punches and started making cards.


I cut the Certainly Celery, Bashful Blue, So Saffron and Very Vanilla cardstock into four 4x8 inch pieces with a 4x4 inch piece leftover. I cut the decorative edge strips that came with the Simply Scrappin' kit into 4 inch sections so they would be just the right size for the cards. I also cut the patterned cardstock into 2x4 inch pieces to go on the front of the cards. I cut a few too many so I had some leftover that could have been two more cards if I hadn't cut up all the cardstock!


I got 39 cards out of this Simply Scrappin' kit (I could have gotten 41...oh well). I had a lot of fun and now I have plenty of cards for my thank you notes! By the way the 4x4 cards fit into the regular medium envelopes for mailing. That way they aren't too small and don't require extra postage due to the shape of the envelope.


Here are a some close ups of the cards.


Current Simply Scrappin' kits are on pages 162 - 165 of the Spring/Summer 2009 Stampin' Up! Idea Book & Catalog.


Enjoy,
Barb

Friday, January 23, 2009

The new Stampin' Up! Spring/Summer 2009 Idea Book & Catalog is here! You can order 24/7 from my Stampin' Up! website just click the link on the sidebar.


Last weekend we celebrated the new catalog with an Out with the Old - In with the New party. This card is one of the Make 'n Take projects. It uses the Love You Much stamp set, Candy Lane Designer Series Paper and the Heart to Heart punch from the Valentine Bundle Special. The little box was the little extra goodie that I gave to those who were there. It also uses the Candy Lane DSP and Heart to Heart punch. Both project were changed a little from their original ideas which came from a couple of fabulous demonstrators. Unfortunately, I can't remember which blogs I found them on. Sorry.


Projects use: Love You Much stamp set, Candy Lane DSP, Heart to Heart punch, Riding Hood Red CS and taffeta ribbon, Pink Pirouette CS, Vellum CS, Basic Black Classic ink, Old Olive Stampin' Write Marker, Boho Blossoms punch, stylus, mat pack, Very Vanilla taffeta ribbon, pillow box die and Big Shot! die cut machine


Here's the other Make 'n Take project. It uses the, now retired, Fabulous Flowers stamp set. Flowers are stamped in Regal Rose, Rose Red and Kiwi Kiss on a scallop circle cut with the Big Shot!. Ribbon and cardstock are also Kiwi Kiss. Bottom edge is done with the scallop edge punch and dots added with the white gel pen. Quick, easy, simple. Just change the stamp set and/or the colors and you have a whole new card! Once again, I found a similar card somewhere along the way and changed it a bit. I really need to write these things down.