Monday, November 23, 2009

Stampin' Up! OnLine Holiday Extravaganza!

Now through November 30, Stampin' Up! is having a huge on-line Holiday sale! Over 40 items and product bundles are on sale 30% - 50% off! Click HERE to shop my Stampin' Up! website.


Sunday, November 15, 2009

November Stamp Club Projects

My Stamp Club met yesterday. We had such a great time making these two Christmas cards! The ladies loved the little snowman treat boxes that I made for each of them.


On this card we cut out the Top Note die with the Big Shot! then used the Scenic Season stamp set on the front which we stamped in White Craft Ink and embossed with Iridescent Ice embossing powder. We masked the words and just stamped the trees. Then we just inked the words and using the Stamp-a-ma-jig we positioned the words in closer to the trees. Gotta love that Stamp-a-ma-jig! Before attaching the Top Note we stamped the little snowflakes from the Serene Snowflakes set in VersaMark in each corner and embossed with Iridescent Ice just to add a little sparkle. The bow is just a knot of Organza Ribbon attached with a glue dot. The card corners were rounded with the corner rounder punch.


Inside the card we stamped the sentiment from Seneic Season in Night of Navy. The snowflake is the Simple Snowflake stamp from page 208 in the catalog stamped in VersaMark, embossed with Iridescent Ice and punched out with the Jumbo Snowflake punch. It is attached with SNAIL. TIP: lay your delicate item to be SNAILed on the glossy side of the backing paper from your stamp lables, hold down with one hand and add your SNAIL. The SNAIL won't stick to the glossy paper and make a mess of your stamping area!


The second card we did involved lots of cool techniques! First we used the Big Shot! and the Petals-a-Plenty embossing folder to make the Whisper White layer of the front of the card. I used the Oval Scallop Frame die to make an oval template to use with the embossing folder to create the smooth area that we stamped in. Since the oval was just the right size it was perfect to put the frame around. Dasher was inked with VersaMark then Soft Suede, stamped, then embossed with Iridescent Ice. You can't really see the sparkle in this picture. The bow is Kraft Taffeta Ribbon attached with a glue dot.


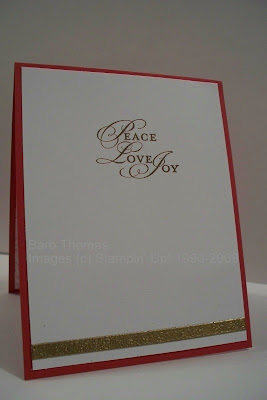
We stamped the inside of the card with a sentiment from the All Holidays stamp set in Soft Suede. Across the bottom we placed a strip of Sticky Strip and covered it with gold embossing powder. Don't overheat the embossing powder on the Sticky Strip. You only want to melt the embossing powder...not the Sticky Strip. The Sticky Strip adds a nice clean line!


Here's the little snowman treatbox. It's he cute! I filled him with a hot cocoa packet and candy cane. He was inspired by an idea shared by BJ Peters on the Stampin' Up! demonstrators website. This little guy is made with the Top Note die, corner rounder, 1 1/4" circle punch, 3/4" circle punch, 1/4" circle punch and Boho Blossoms punch. The nose is cut free hand. The box that he is attached to is 3" wide, 1" deep and about 4 1/2" tall.

Happy Stamping!
Barb

Friday, October 2, 2009


This cute Christmas card is quick and easy and straight from the Stampin' Success magazine. That's the great monthly magazine Stampin' Up! sends to their demonstartors. It uses the new Delightful Decorations stamp set, coordinating Ornament punch and coordinating Sassy Sparkles wheel from the Holiday Mini catalog. Click HERE to shop my website then click on Shop Now. Don't forget to check out the DEAL OF THE WEEK! More punches!

Enjoy,
Barb
Posted by Picasa

Friday, March 27, 2009

March Stamp Club Projects

Last weekend we met for Stamp Club and made two great projects. Both involved the Big Shot! The first project took a little time and was a bit "fussy" as my friend, Eileen would say. But it turned out great and was a real WOW! card. I cased the idea from this wonderful blog. I decided to go with a black and white card with a twist and a surprise. Twist the ribbon handle and - surprise! there's color! We also did some masking and used Stampin' Pastels (chalks) to color the flowers and stencil the leaves. We used a leaf stencil made with the SU! Little Leaves sizzlit die. Punch out the leaves and use them on another project - use the negative that's left for a stencil. This is a 5 1/4" x 5 1/4" card which fits in the 5 1/2" x 5 1/2" envelope


Stamp Set: Fifth Ave Floral; Classic Ink: Basic Black; Cardstock: Basic Black, Whisper White, Brushed Silver; Accessories: Clear Rhinestone Brads, (Half pearls on this sample from Pretties Kit) Piercing tool and mat from Took Kit, Organza Ribbon, Big Shot!, Scallop Circle die, Paper snips, glue dots, Stampin' Pastels, daubers, Lace edge punch (inside card).


The second project was a quick and easy card. It's my new favorite card to make and it looks good in any color. We sponged the edges and middles of the flowers to give them a little more color and depth.

Stamp Sets: Elegant Greetings; Classic Ink: Regal Rose; Cardstock: Pink Piroutte, Whisper White, Barely Banana, Gable Green; DSP Pink Pirouette; Accessories: Lace edge punch, Big Shot! SU! Simple Flower embosslit die, SU! Little Leaves sizzlit die, Whisper White Taffeta Ribbon, sponge.

Enjoy,

Barb

Friday, February 20, 2009

February Stamp Club Projects

Another round of Stamp Clubs are starting. This weekends projects feature a vellum card that was inspired by a card that my upline, Jan made for a swap. The second card uses an envelope to create a unique and beautiful package for this card. The card and envelope feature Sale-a-bration! stamp sets, ribbons and DSP.


Happy Stamping!

Barb

Saturday, February 14, 2009

Sale-a-bration! sample

I made this card for a demonstrator swap that I took part in. I cased the card on page 4 of the Sale-a-bration! brochure. I love the SAB items they have this year! I used the Polka Dot Punches stamp set, Delicate Dots DSP and the 5/8" So Saffron grosgrain ribbon - all Sale-a-bration! items. I also used Certainly Celery, Bashful Blue and Barely Banana card stock, Certainly Celery Classic ink, buttons from Fresh Favorites II, word window, 1-1/4" circle punch, 5-petal punch and the scallop circle punches. (Sorry, I forgot which set I used the "thank you" from.)


Enjoy,
Barb

Saturday, January 31, 2009

12 x 12 Folded Book

I spent a wonderful day today with about 20 other demos from the group that I'm a part of. We met with my 5th upline, Jan from Arizona. She came, despite the cold, to share her expertise and a cute book project. (I'll share that book another day.) We had a great time and lots of fun! I shared a 3 minute demo with the group. This cute little book that I shared is just one 12x12 sheet of Designer Series Paper scored, cut and folded then, held together with a little Sticky Strip.


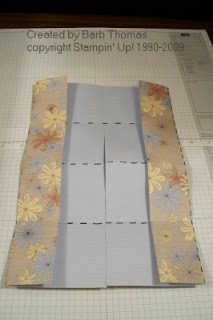
Score along one edge at 3", 6" and 9". Turn and score at 2", 6" and 10". I marked the score lines so you can see where they are.


Cut along the 6" score line from the top edge, down 9" to the intersection of the last score line (marked on the right-hand photo above with a solid line).

Place Sticky Strip in corners at each end of 2" scored sections as shown. Fold and adhere edged. These will become the pockets in the book.


Accordion fold the other scored lines and fold as shown. Place Sticky Strip around edge as shown. Fold book in half and adhere tape. Accordion fold book together.


For the binding cut a 4" x 1-1/4" piece of coordinating card stock. Score it longways at 1/2" and 3/4". Fold along score lines. Use Sticky Strip to attach binding along folded edge of book. Book can be held closed with ribbon or a belly band. Decorate cover as desired. Fill pockets with verses, well wishes, pictures, money, etc.
Enjoy,
Barb